Jira
Configure Jira triggers to create issues automatically whenever users submit feedback
Overview
The Jira destination lets you automatically create Jira issues every time someone submits feedback through your forms. Whether you're tracking bug reports, feature requests, or general customer sentiment—Jira triggers ensure that every piece of feedback gets turned into a trackable issue in your project, so nothing slips through the cracks.
This guide walks you through the full setup, from creating your first Jira destination to customizing how those issues look, what labels they get, and how the description is formatted. We'll keep things straightforward and explain each step along the way so you can get up and running without any guesswork.
What You'll Need
Before you start, make sure you have:
- A feedback configuration — The form or feedback stream you want to send to Jira
- A Jira account — Access to a Jira instance (Cloud or Server)
- Jira API credentials — Your Jira host URL, the email associated with your account, and an API token for authentication
- A Jira project — The project where you want issues to be created (you'll need its project key, e.g., ENG, WEB, PRJ)
If you're not sure how to create an API token, Atlassian provides clear instructions: go to your Atlassian account settings, create a new token, and use it when configuring your Jira destination. Keep it secure—treat it like a password.
Step 1: Open the Destinations Page
Head to the Destinations section in your encatch dashboard. This is where you manage all your integration endpoints—Slack, Discord, Email, GitLab, Webhooks, and of course, Jira.
On the Destinations page, you'll see a table showing any destinations you've already set up (or an empty table if you're starting fresh). In the top-right corner, look for the Add Destination button—that's your starting point.

Click Add Destination to open the configuration flow.
Step 2: Add a New Destination
A modal titled Destinations (or Add New Destination) will appear. You'll notice a tab for Realtime—this is the type you want for instant Jira issue creation whenever feedback is submitted.
The modal is divided into a few sections:
Destination Description
At the top, you'll see a field for Destination Description. Enter a brief description of what this destination is for—something like "Create Jira issues for product feedback" or "Bug reports from in-app feedback". This helps you and your team understand the purpose of this integration at a glance.
Select from Available Destination Connectors
Scroll down to the section Select from available destination connectors. You'll see a table listing the available connectors: Email, GitLab, Jira, Slack, Discord, and Webhook.
Find the Jira Notification row:
- TYPE: Jira (with the Jira icon)
- NAME: Jira Notification
- DESCRIPTION: Send Notifications to Jira as Issues
- VERSION: v1
Click the Select button next to Jira Notification to choose it as your connector. Once selected, the button will turn purple and show Selected.
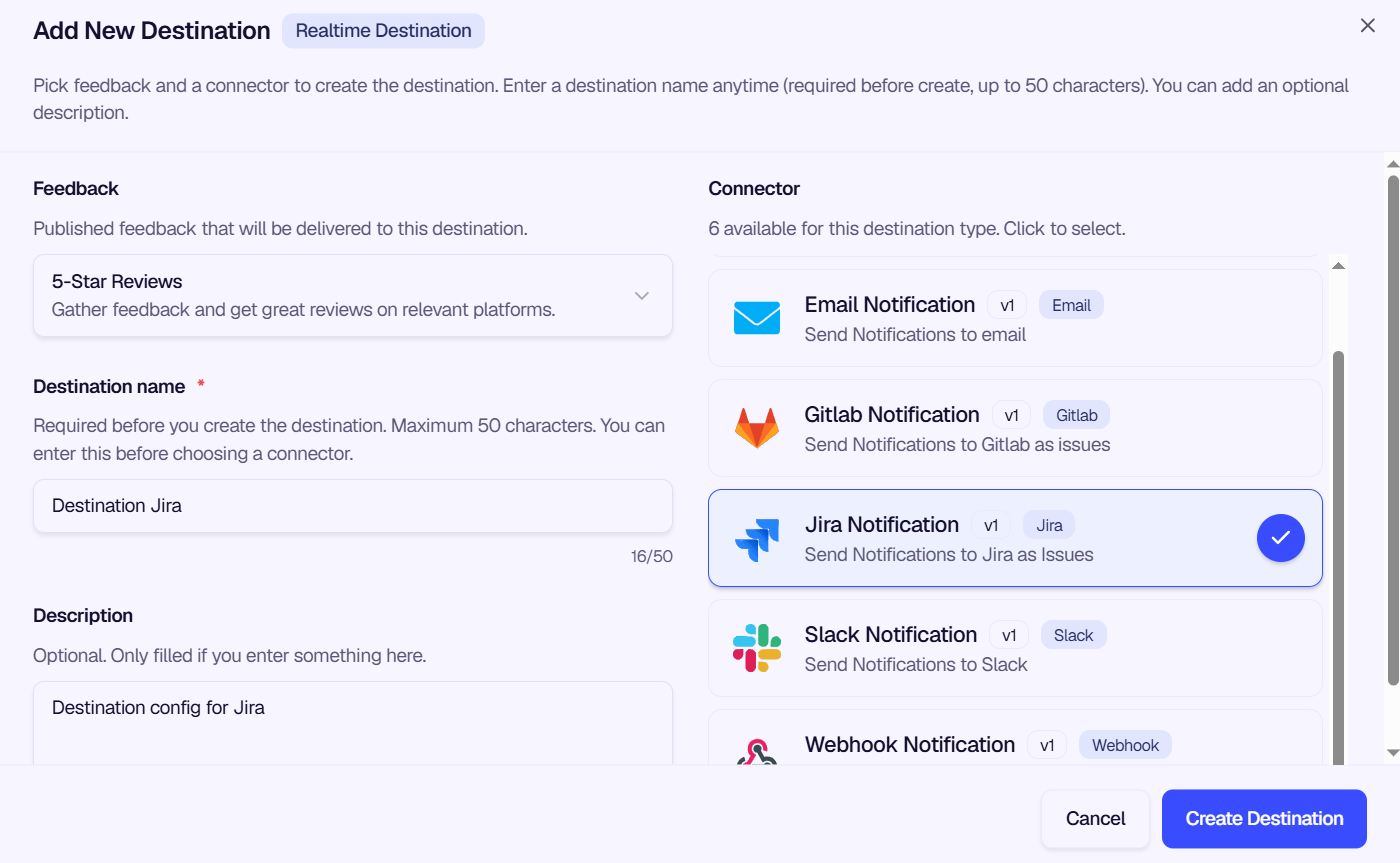
Then click Create Destination at the bottom of the modal to proceed.
Step 3: Configure Your Jira Destination
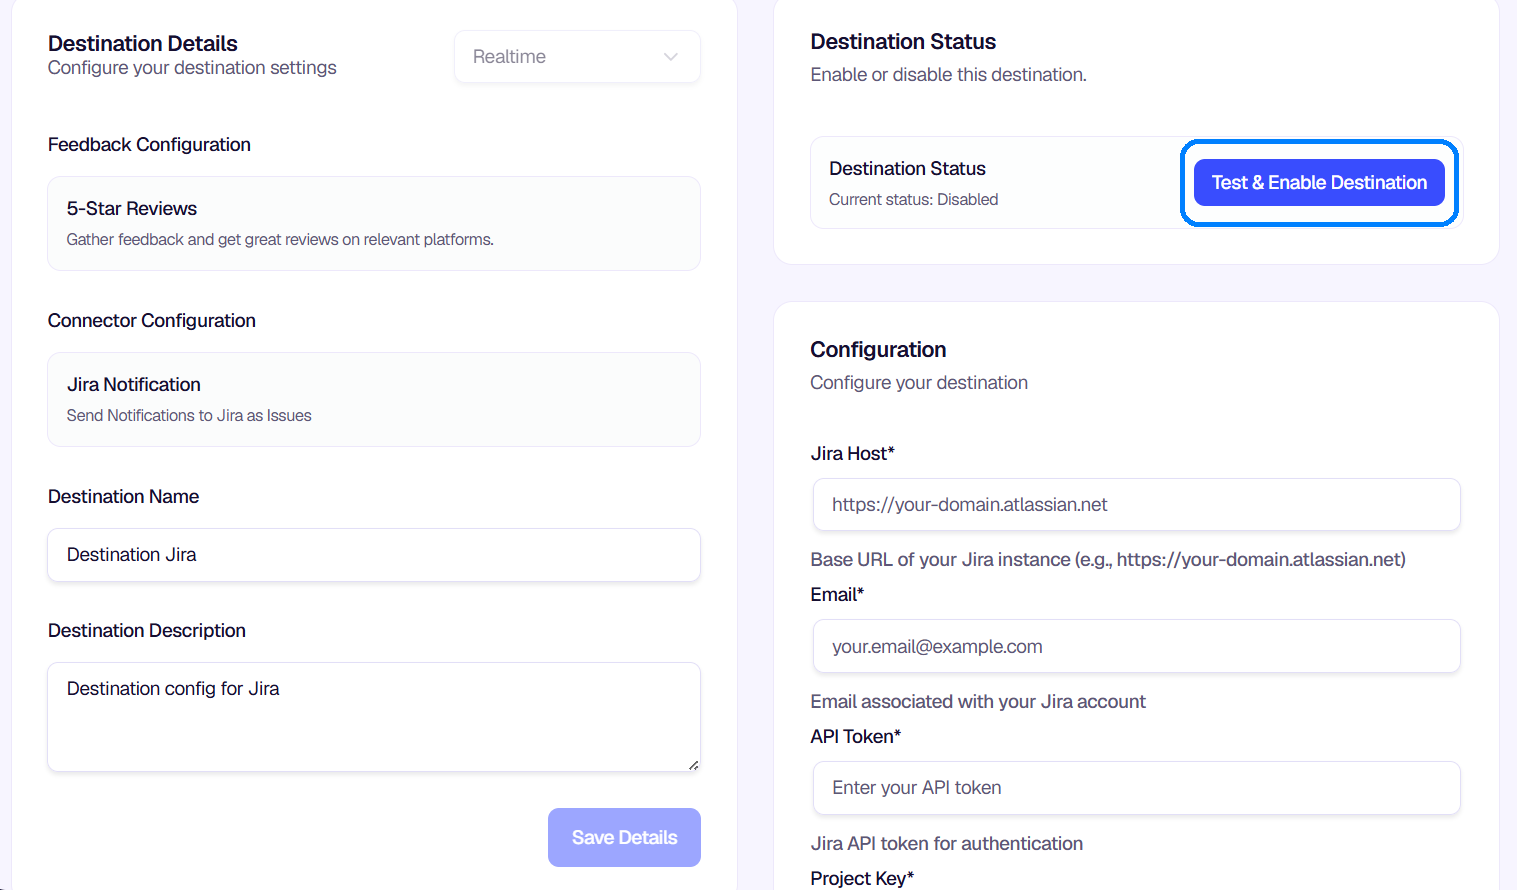
After creating the destination, you'll land on the Configure your feedback destination settings page. This is where you configure all the details that control how and where your Jira issues are created.
Destination Details (Left Column)
On the left, you'll see cards for:
- Destination Details — Confirm the type (e.g., Realtime) and any high-level settings
- Feedback Configuration — The feedback form you linked in the previous step
- Connector Configuration — Shows "Jira Notification" and its description
- Destination Name — Edit the name you gave earlier if needed (e.g., "Destination Jira")
- Destination Description — Edit the description if needed
Click Save Details when you're done with these fields.
Jira Configuration (Right Column)
The right side is where the Jira-specific settings live. These are the credentials and project details encatch needs to create issues in your Jira instance.
Jira Host
Enter the base URL of your Jira instance. For Jira Cloud, this typically looks like https://your-domain.atlassian.net. For Jira Server or Data Center, use your organization's Jira URL. This field is required.
Enter the email address associated with your Jira account. This is the account that will be used to authenticate with the Jira API. It must match the account that owns the API token you'll provide next.
API Token
Enter your Jira API token. This is used for secure authentication—encatch never stores your Jira password. Create one from your Atlassian account settings if you haven't already. The value will be masked for security once saved.
Step 4: Configure Issue Fields
Below the connection settings, you'll find the fields that control how each Jira issue is created when feedback arrives. These let you map feedback to the right project, issue type, and content.
Project Key
Enter the key of the Jira project where issues should be created. Project keys are short identifiers like ENG, WEB, or PRJ—you can find yours in your Jira project settings or in the project URL. This field is required.
Issue Type
Choose the type of Jira issue to create—for example, Task, Bug, or Epic. Make sure the type you select exists and is available in your project. Jira projects can have different issue types enabled, so double-check that your choice matches your project's configuration.
Labels
Add comma-separated labels to organize and categorize your feedback issues. For example: frontend, urgent, customer-feedback. For consistency, use labels that already exist in your Jira instance so you can filter and search effectively.
Title / Summary
This is the main subject or headline of the Jira issue. You can use a static example like "Unable to login from mobile app" or use template variables to pull in dynamic content from the feedback (e.g., the user's summary or first response). This field is required.
Description
This is a larger text area where you define the body of the Jira issue. The description supports a JSON-based document structure that allows rich formatting—headings, paragraphs, lists, and more. You can also use template variables to inject feedback data dynamically.
A typical structure might look like:
{
  "type": "doc",
  "version": 1,
  "content": [
    {
      "type": "heading",
      "attrs": { "level": 2 },
      "content": [
        { "type": "text", "text": "Feedback Summary" }
      ]
    }
  ]
}
Whatever you put here will be prepended to the content in the issue description. This is where you can include feedback responses, device info, timestamps, and other metadata so your team has full context when they open the issue in Jira.
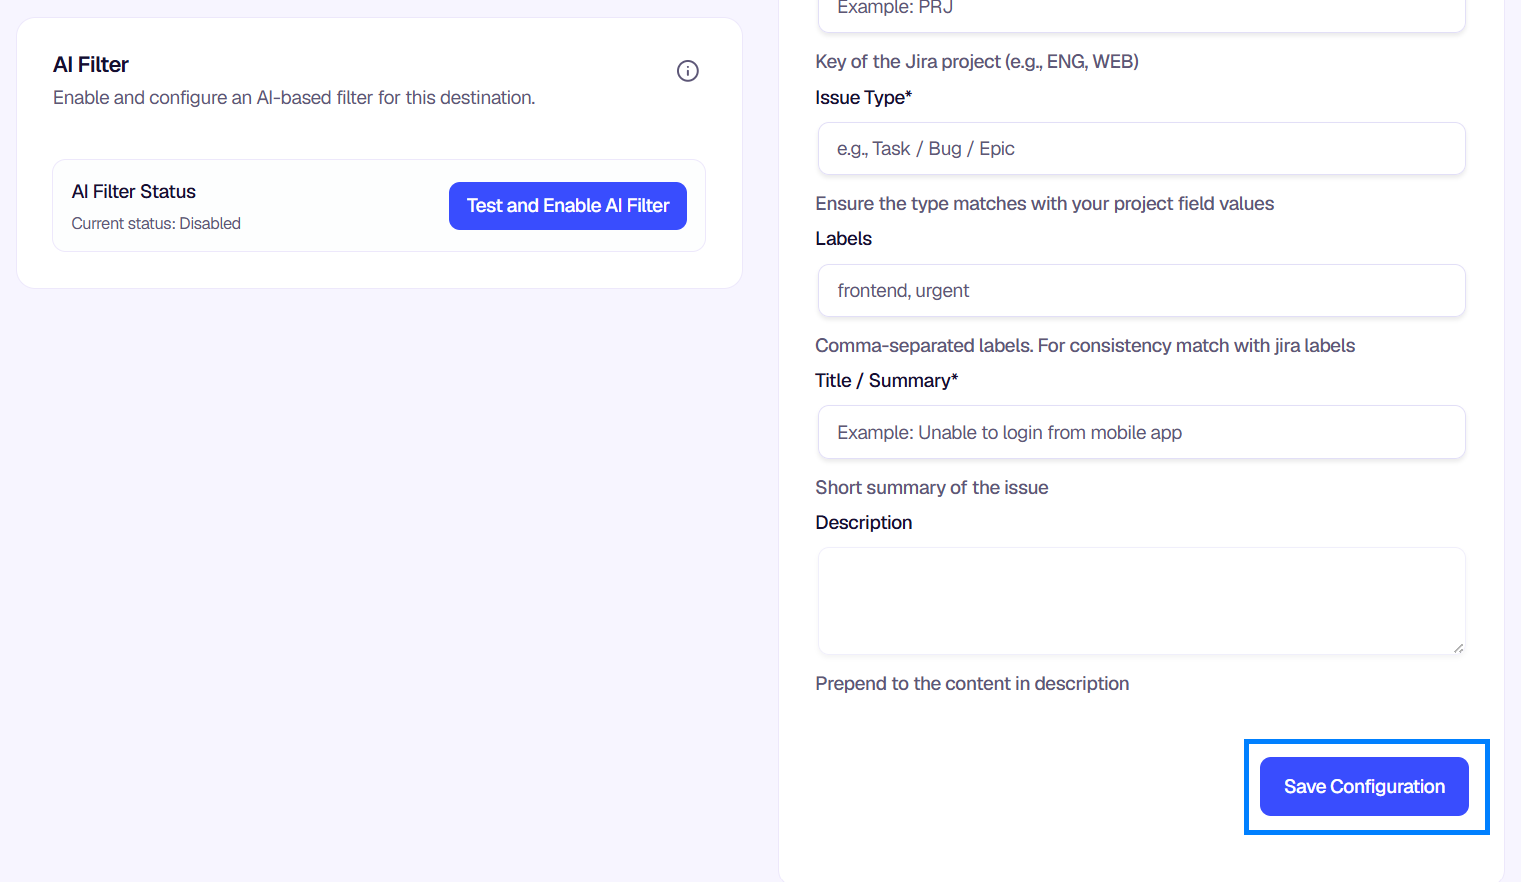
Click Save Configuration when you're done.
Step 5: Enable the AI Filter (Optional)
If you want to filter which feedback triggers a Jira issue, you can enable the AI Filter.
The AI Filter uses natural language prompts to decide which feedback should be forwarded to Jira. For example, you might only want to create issues for negative feedback, or for feedback that mentions specific keywords like "bug" or "crash."
To enable it:
- In the AI Filter section, click Test and Enable AI Filter
- Configure your prompt to define the criteria
- Test the filter with sample feedback to ensure it behaves as expected
If you prefer to create a Jira issue for every feedback response, you can leave the AI Filter disabled.
AI Filters use AI Credits. Each execution consumes 1 AI Credit. See the AI Filters guide for more details.
Step 6: Test and Enable
Before going live, test your setup. On the Destination Status card, click Test & Enable Destination to verify your Jira credentials work and that encatch can successfully create a test issue. Once the test passes, the destination will be enabled and will start creating real issues for every new feedback response that matches your configuration (and any AI filter you've set up).
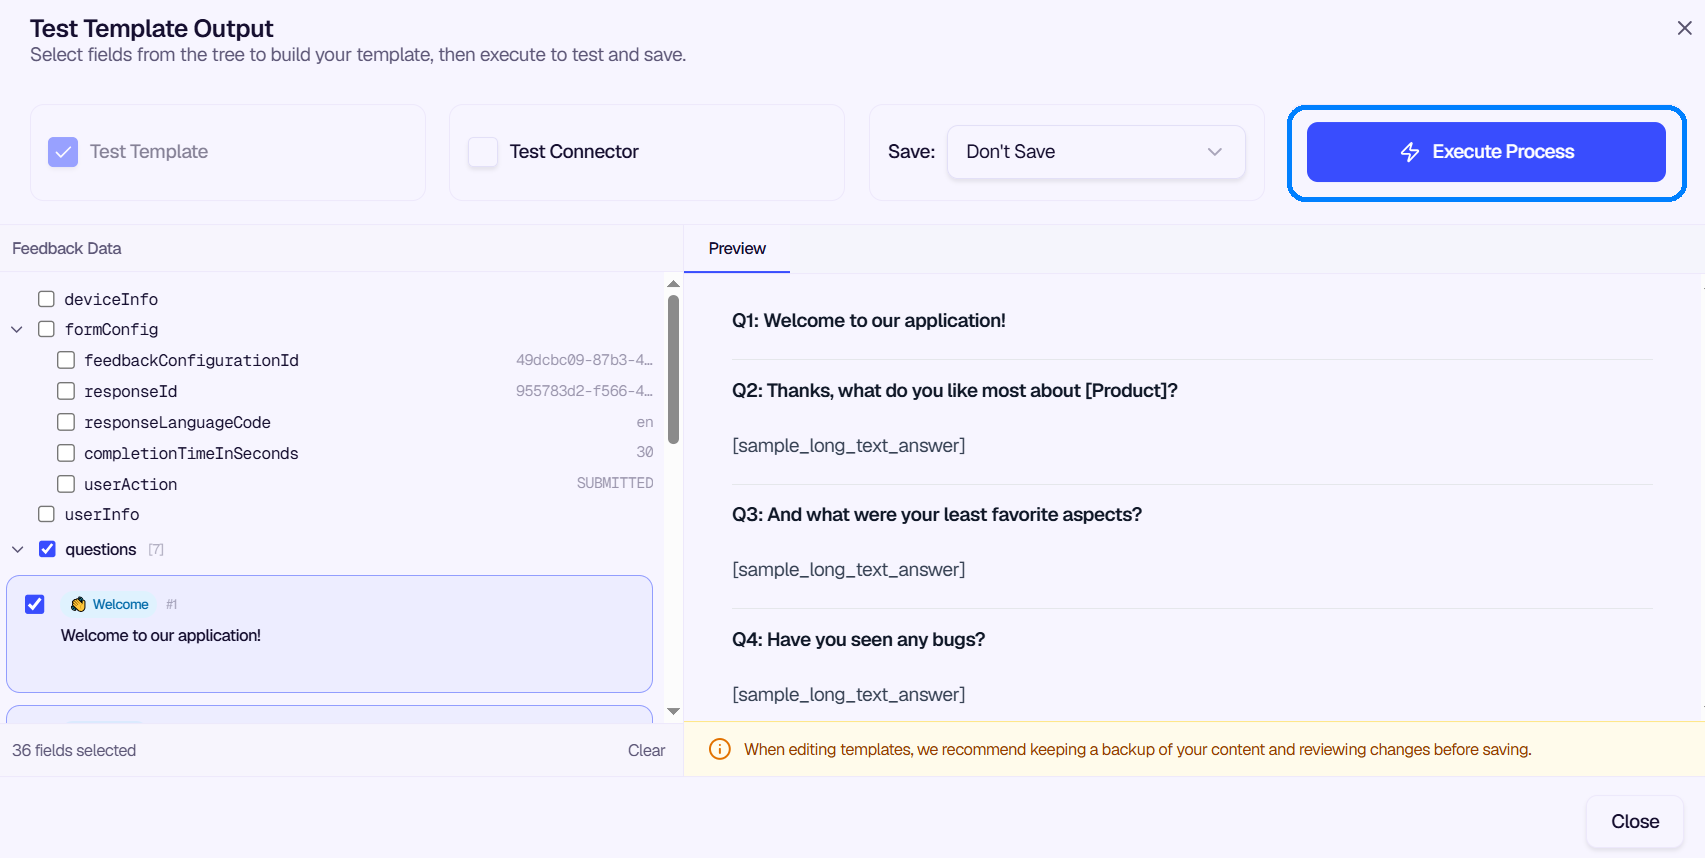
Test Template Output
To preview exactly how your Jira issues will look with real feedback data, use the Test Template Output feature. This lets you:
- Load sample feedback data (or use the most recent record from the last 7 days)
- Edit the Description Configuration JSON to refine your template
- Click Execute Process to see the generated description output
- Adjust your template until the output looks right
You can toggle between Test Template (to preview the formatted output) and Test Connector (to verify the Jira connection). This is especially useful for making sure your title, description, and labels are pulling in the right data from your feedback forms.
Summary
Here's a quick recap of the flow:
Go to Destinations — Click Add Destination on the Destinations page.
Select Jira connector — Add a destination description, then select Jira Notification from the connectors table and click Create Destination.
Configure Jira credentials — Enter your Jira Host, Email, and API Token to connect encatch to your Jira instance.
Set up issue fields — Configure the Project Key, Issue Type, Labels, Title/Summary, and Description template so each feedback response becomes a well-structured Jira issue.
Optional: Add AI Filter — If you want to filter which feedback creates Jira issues, enable and configure the AI Filter.
Test and enable — Click Test & Enable Destination to activate, then use Test Template Output to preview how your issues will look.
Tips and Best Practices
- Use descriptive labels — Labels like
feedback,in-app, orurgenthelp your team triage and filter issues quickly. - Match issue types to your workflow — Use Bug for defect reports and Task for general feedback or feature requests.
- Leverage the description template — Include device info, URL, and user context so developers have everything they need without digging for it.
- Test before enabling — Always run a test to ensure credentials work and templates render correctly.
- Consider AI filters — If you receive a lot of feedback, an AI Filter can reduce noise by only creating issues for feedback that meets your criteria.
Troubleshooting
Was this page helpful?