GitHub
Configure GitHub destinations to automatically create and manage GitHub issues from feedback submissions
Overview
The GitHub destination lets you automatically create GitHub issues every time someone submits feedback through your forms. encatch uses a Github App (Self Hosted) connector so issues are created through a GitHub App installed on your repository—not a personal access token.
This guide follows the current admin UI: add a realtime destination, enter GitHub App credentials, build the issue body with Test Template Output, and enable the destination.
What You'll Need
Before you start, make sure you have:
- A published feedback form — Only published feedback appears in the Add Destination dialog
- A GitHub App — Created in your GitHub organization or user account
- GitHub App installed on the target repository — With permission to create issues
- GitHub App ID — From your app’s settings on GitHub
- Private key (.pem) — The key file generated when the GitHub App was created
- Repository owner and name — The GitHub user or organization plus the repo slug (for example,
octocatandhello-world)
Step 1: Open the Destinations Page
Go to Destinations in your encatch dashboard. Click + Add Destination in the top-right corner.

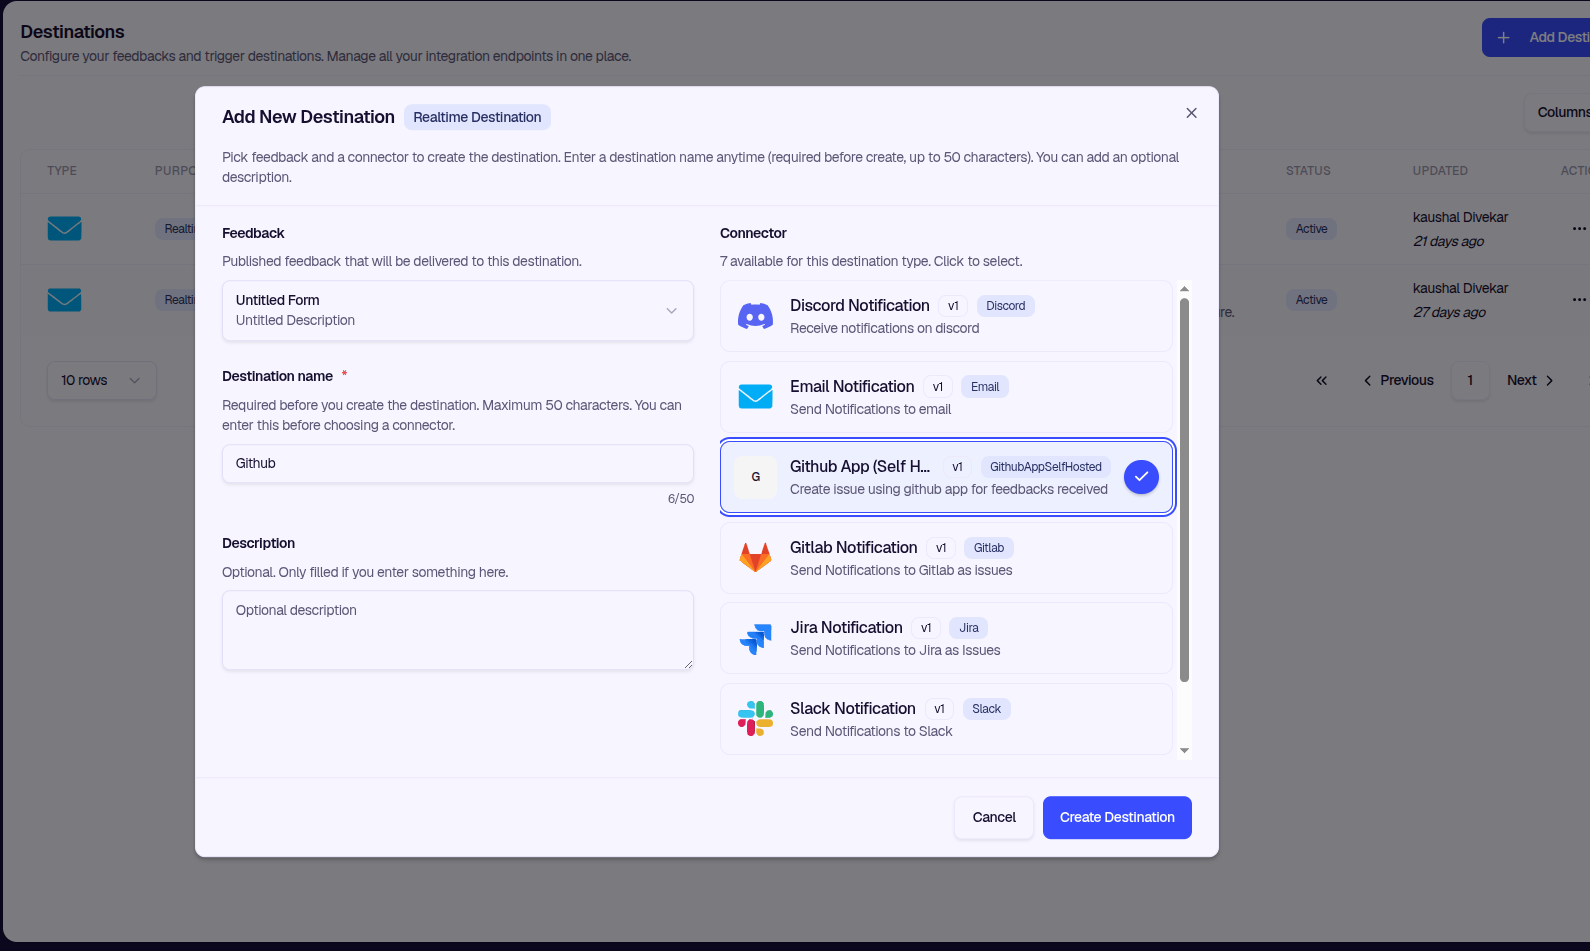
Step 2: Add a New Destination
The Add New Destination dialog opens with a Realtime Destination badge.
Complete these fields:
Feedback
Select published feedback that will be delivered to this destination. The dropdown shows each form’s title and description. If nothing appears, publish your feedback form first.
Destination name (required)
Enter a name before you click Create Destination. Maximum 50 characters at create time (character counter shown in the dialog).
Description (optional)
Optional short description. It is only saved if you enter text here.
Connector
In the connector list, click Github App (Self Hosted):
| Property | Value |
|---|---|
| Name | Github App (Self Hosted) |
| Tag | GithubAppSelf-hosted |
| Version | v1 |
| Description | Create Issue using github app for feedbacks received |
Only non-experimental realtime connectors are listed. Click a connector once to select it (checkmark appears), then click Create Destination. You are taken to the Edit Destination page.
Step 3: Configure Your GitHub Destination
The Edit Destination page has two columns: Destination Details on the left and Destination Status / Configuration on the right.
Destination Details (left column)
- Type — Realtime (shown in the type selector; not editable after create)
- Feedback Configuration — The linked published form (read-only)
- Connector Configuration — Github App (Self Hosted) with description Create issue using github app for feedbacks received
- Destination Name — Edit if needed (up to 100 characters on the edit page), then click Save Details
- Destination Description — Optional (up to 500 characters)
Save Details is enabled only after you change the name or description.
GitHub App credentials (right column — Configuration)
While the destination is disabled, fill in all required fields in the Configuration card:
| Field | Required | Description |
|---|---|---|
| GitHub App ID | Yes | Unique identifier of your GitHub App (App settings on GitHub). Placeholder: e.g., 123456 |
| Private Key (.pem) | Yes | Full contents of the generated private key file, including -----BEGIN RSA PRIVATE KEY----- and -----END RSA PRIVATE KEY----- |
| Repository Owner | Yes | GitHub username or organization name. Placeholder: e.g., octocat |
| Repository Name | Yes | Repository slug only (not owner/repo). Placeholder: e.g., hello-world |
Click Save Configuration when all required fields are filled in.
When the destination is enabled, the Configuration form is read-only. Use Disable Destination first, then edit credentials and click Save Configuration again.
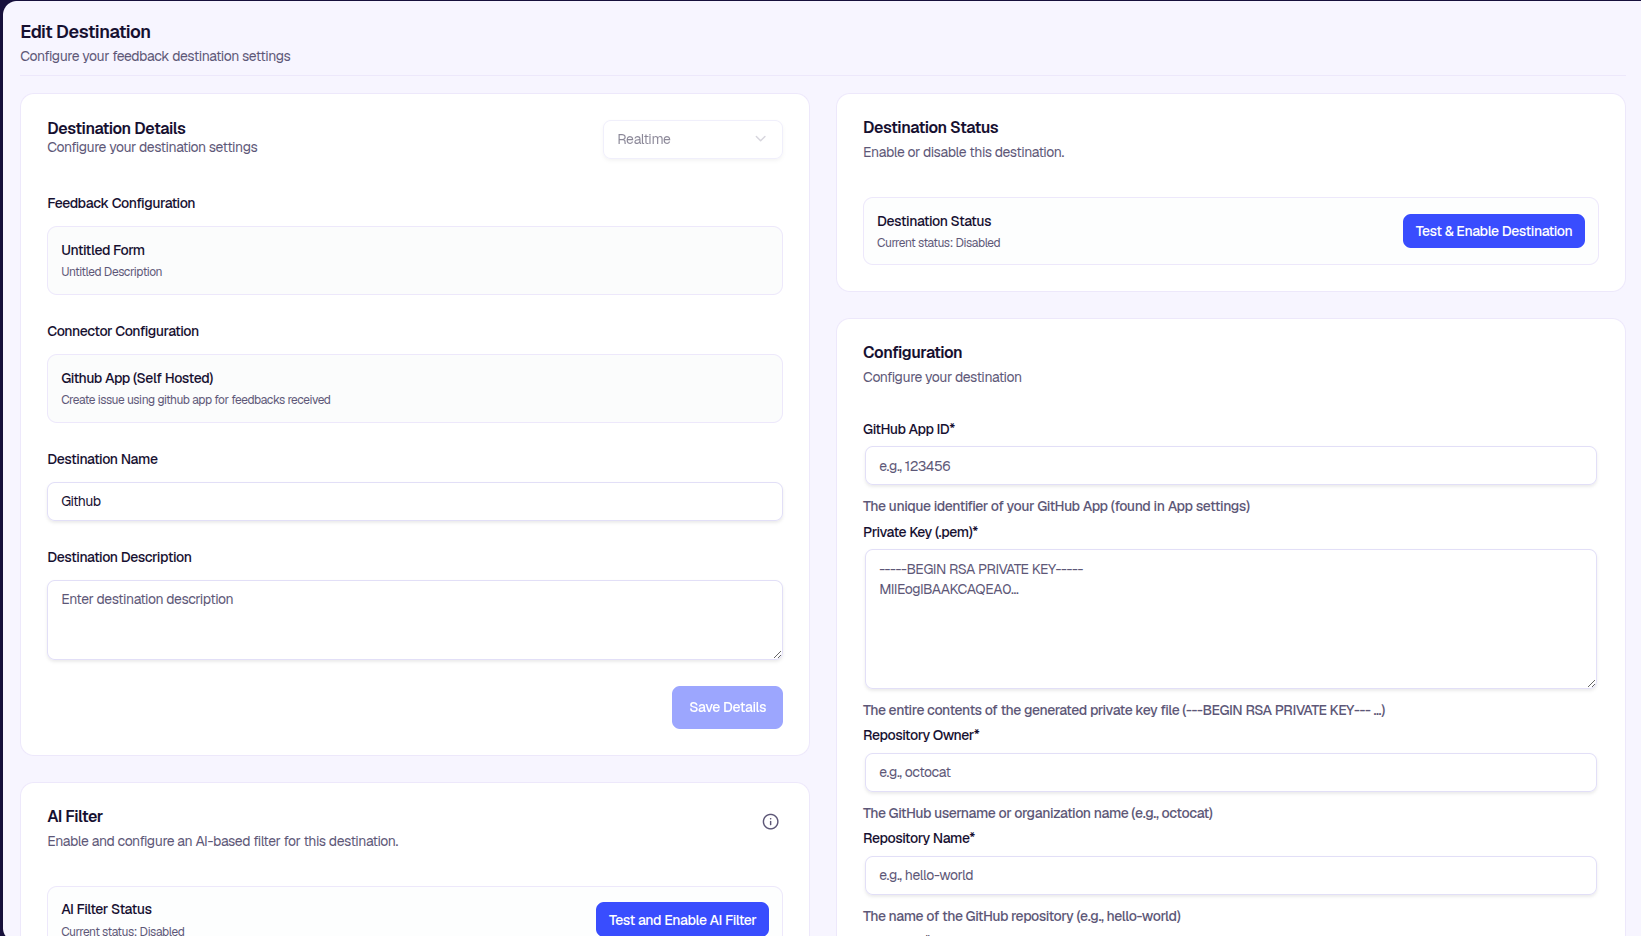
Unlike GitLab or Jira, this connector does not show separate Issue Title, Issue Description, or Labels fields in Configuration. Issue content is built in Test Template Output (next step).
Step 4: Test Template Output and Enable
Before going live, open Test & Enable Destination on the Destination Status card. This opens the Test Template Output dialog.
Build the issue body
- In the Feedback Data tree, select the fields to include (
deviceInfo,formConfig,geoInfo,userInfo, question responses, and more). - Review the Preview tab to see how the GitHub issue body will read.
- Use Test Template (always on when templates are available) to validate formatting.
- Optionally check Test Connector to verify GitHub App credentials and repository access.
- Set Save to Don't Save, Save and Enable, or Save and Disable.
- Click Execute Process to run the test and apply your save choice.
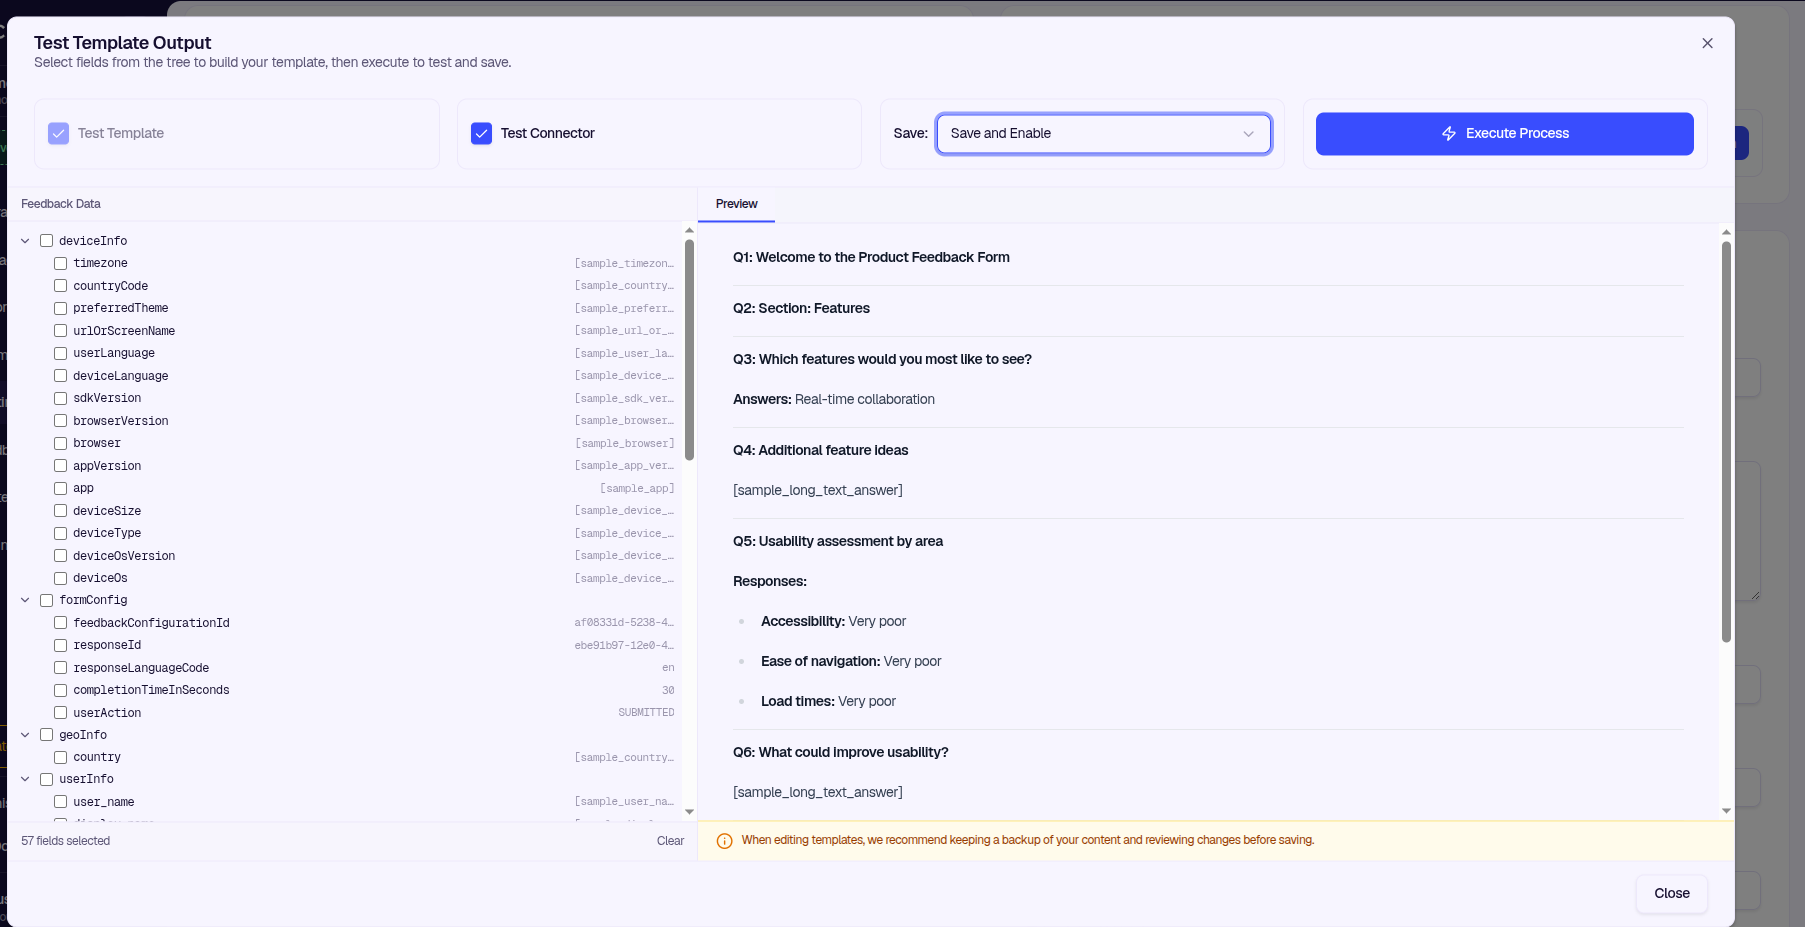
When editing templates, keep a backup of your content and review changes before saving.
After a successful Save and Enable, Destination Status shows Enabled and new matching feedback creates GitHub issues.
Step 5: Enable the AI Filter (Optional)
On the left column AI Filter card:
- Current status — Disabled or Enabled
- Test and Enable AI Filter — Opens the filter setup dialog
- When enabled, Edit & Test lets you change the prompt
The AI Filter uses natural language to decide which feedback is forwarded—for example, only low ratings or messages mentioning “bug.” See AI Filters. Each filter execution uses 1 AI Credit.
Leave the AI Filter disabled if every submission should create a GitHub issue.
Summary
Add destination — Destinations → + Add Destination → Realtime Destination
Select connector — Choose published feedback, enter a destination name (≤50 chars), select Github App (Self Hosted), click Create Destination
Save app credentials — Enter GitHub App ID, Private Key (.pem), Repository Owner, and Repository Name, then Save Configuration
Test and enable — Test & Enable Destination → select feedback fields in Test Template Output → Execute Process with Save and Enable
Optional — Configure AI Filter to limit which feedback creates issues
Tips and Best Practices
- Install the GitHub App on the repo first — encatch cannot create issues until the app is installed on the target repository with issue creation permission.
- Paste the full private key — Include the
BEGINandENDlines exactly as in your.pemfile. - Use owner and repo separately — Repository Owner is the user or org; Repository Name is the repo slug without the owner prefix.
- Use Test Template Output — Select only the feedback fields your team needs in GitHub issues.
- Test the connector — Enable Test Connector in the dialog to catch credential or permission errors before enabling.
- Disable before editing config — Saved credentials cannot be changed while the destination is enabled.
Troubleshooting
Was this page helpful?